 fr
fr nl
nl de
de- Home
- DECK FASTENERS
- Cobra® HYBRID fastening clip 7-22
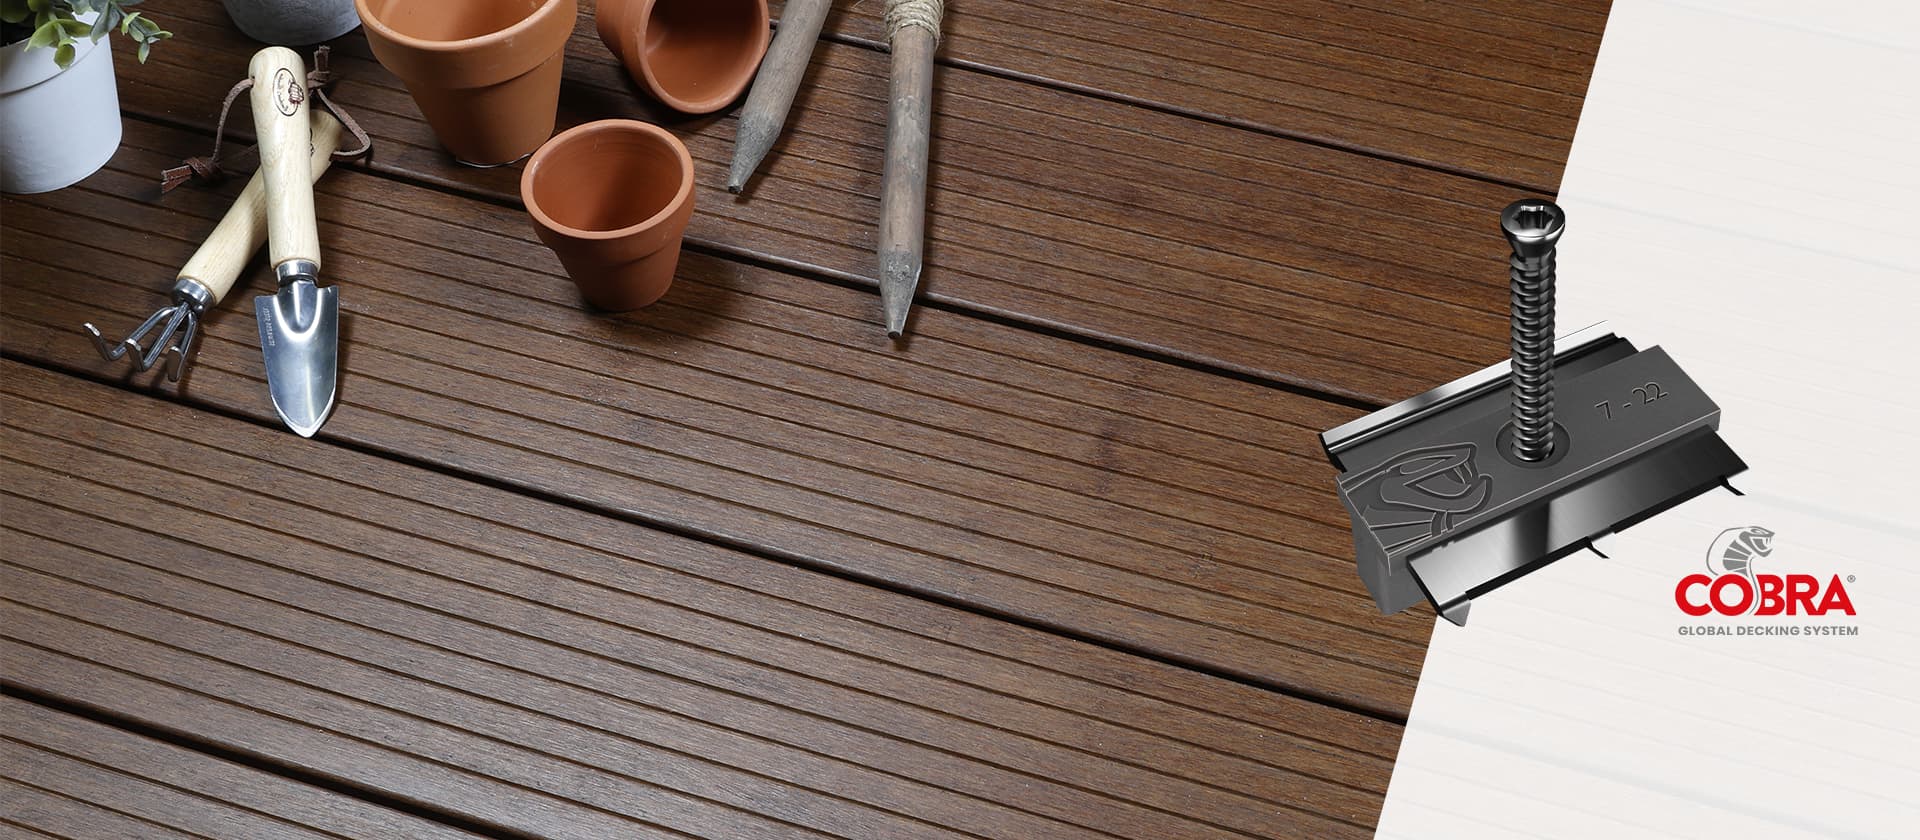
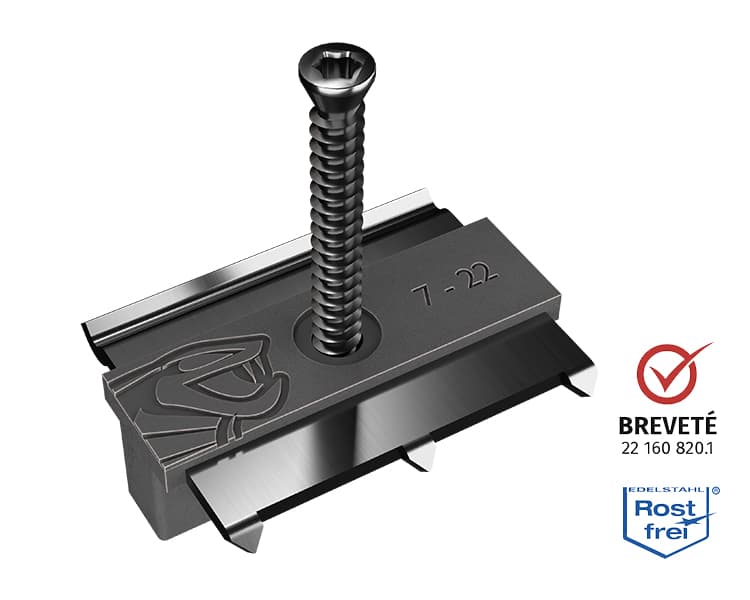
Cobra® HYBRID fastening clip 7-22
Ideal for stable wood decking


- Slats can be removed individually
- Pre-installed screws: quick and easy to fit
- Asymmetrical wings in 304 stainless steel
- Patented system (no. DM203548)
- Clip suitable for thermo-modified and bamboo boards from 18 to 24 mm thick
- Invisible fixing
The Cobra® Hybrid 7-22 clip concept
The Cobra® Hybrid 7-22 clip is particularly well-suited to stable wood, such as heat-treated wood and bamboo deck boards. The matt black colour helps prevent sun glare. The asymmetrical 304 stainless steel hooks ensure that the boards are held firmly and securely against the joists, while allowing the decking to move as required. With its polypropylene base, the Cobra® Hybrid 7-22 decking clip saves up to 30% of installation time compared with standard clips.
The Cobra® 7-22 clip is part of the Cobra® Hybrid range of clips:
- Cobra® 7-22 clip for bamboo and termo-treated wood decking
- Cobra® 8-18 clip for composite decking
- Cobra® 8-25 clip for hardwood decking
Characteristics of the Cobra® Hybrid 7-22 clip
• Screws: Stainless steel 410 (C1)
• Thickness of stainless steel plate: 1.5mm
• 1 Torx bit
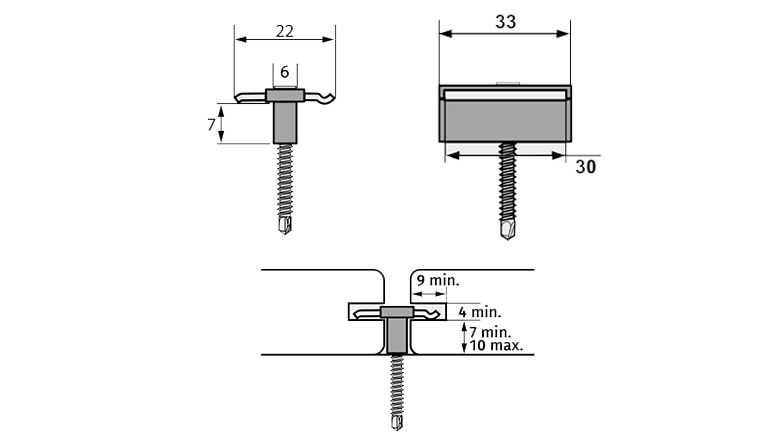
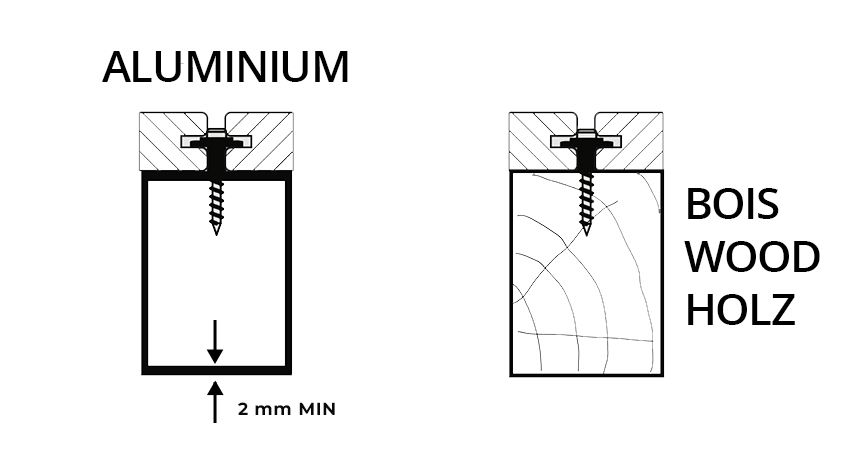
The Cobra® Hybrid 7-22 clip is compatible with bamboo and thermo-modified wood deck boards, for installation on wood or aluminium joists.
The wall thickness of the aluminium joist must be at least 2 mm.
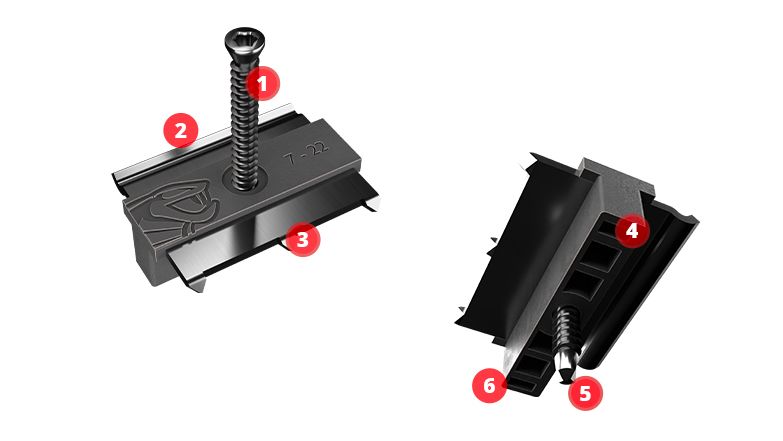
A bi-material clip: Exclusive & Innovative
1 - Stainless steel screw: Torx pattern for comfort and precision
2 - Stainless steel wing: AISI 304, 30 mm wide and 1.20 mm thick
3 - Asymmetrical stainless steel clip: one side with 3 claws and a curved side for optimum positioning and to facilitate expansion of the wood
4 - Hollow structure to absorb decking movements
5 - Self-drilling point for fixing in wood or aluminium
6 - Polypropylene body: black, UV-resistant and 6 mm wide
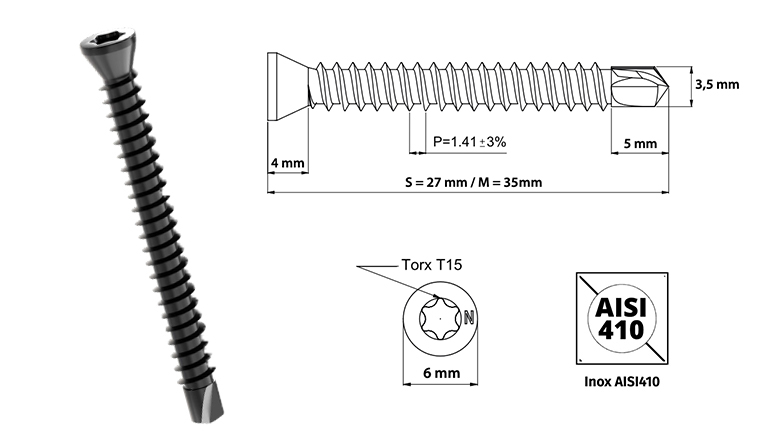
The Hybrid 7-22 clip screw S & M
For quick and easy installation
• 4.32 x 35 mm AISI410 stainless steel screw
• Borrow Torx TX15
• Self-drilling point for wood and aluminium
• Drilling capacity in aluminium: 3 mm
• Drilling in hardwood up to 800 kg/m3 density
• Reduced 6 mm diameter head
• Black lacquered
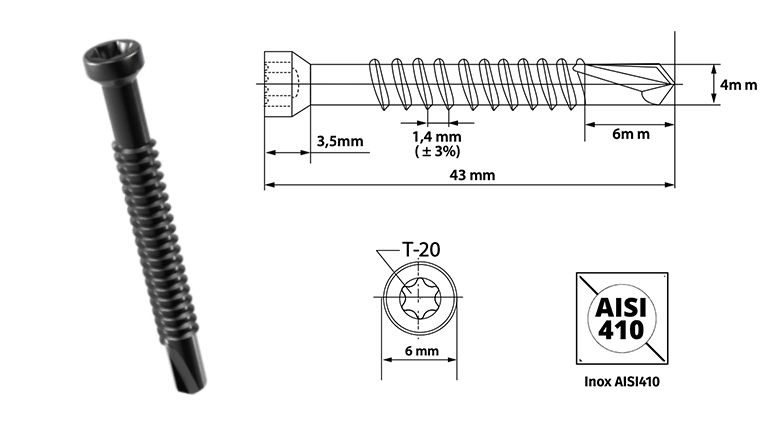
The Hybrid 7-22 clip screw L
For an easy & fast implementation
• 4.8 x 43 mm screws in AISI410 stainless steel
• Torx TX20
• Self drilling tip
• Aluminum drilling capacity: 4 mm
• Drilling in hardwood up to 900 kg/m3 density
• Reduced head diameter 6 mm
• Black lacquered
Optional: AIRSPACER wedge
Used to promote ventilation between the joist and the wood, this accessory does not affect the action of the fixing clip or the movement of the wood.
Its customised design fits perfectly under the hollow base of the clips, making installation quick and easy.
The Airspacer wedge helps to limit the shearing effect on the fixing screw.
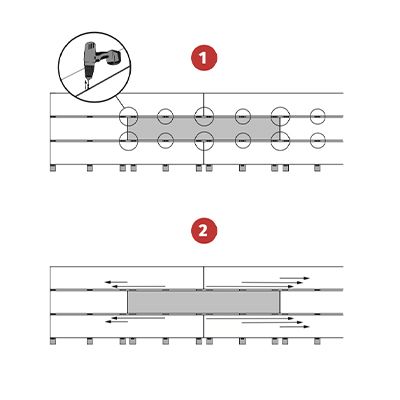
Installing Deck Boards with Cobra® Hybrid 7-22 Clip
|
STEP 1. Fix the Start/End clips to the end of the joists, then insert the first board. |
STEP 2. Insert the Hybrid clips in the board’s groove without screwing them down, then place the next board in touch with the clip’s base. |
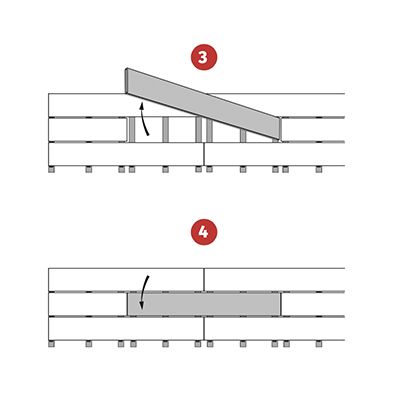
STEP 3. Screw on the Hybrid clips, while holding the boards on either side to ensure a perfect perpendicular fixing. |
STEP 4. Repeat the operation and finish with the Start/End clip to fix the last board. |

The use of clamps is highly recommended. It facilitates and optimizes the clips installation, enabling fast and precise screwing of several boards in a row.
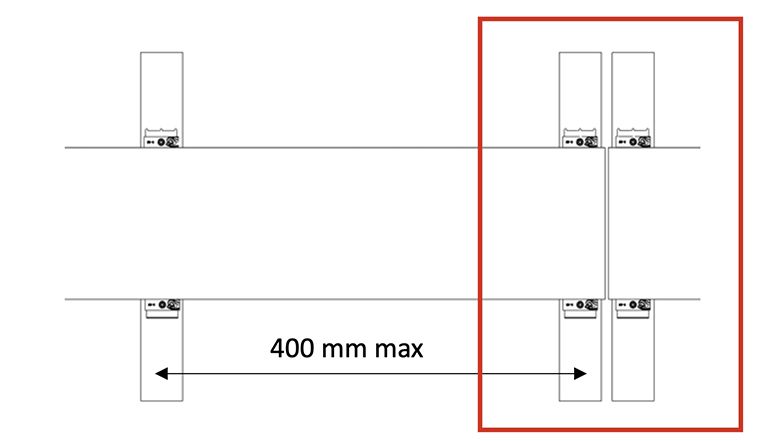
Important: finger-jointing the boards
To join the two boards together, it is essential to double the joist so that two separate clips can be fitted at each end of the board.
The maximum distance between two joists is 40 centimetres.
A universal clip
The Cobra Hybrid 8-25 clip is universal. It screws on all your joists, whether wooden or aluminum, thanks to a high-performance screw and self-drilling. Aluminum joists wall should be 2mm thick at the minimum.
We have developed this clip to meet all your decking projects.
A strong resistance to tearing
Our design office has submitted this model of clip "Hybrid" made with two complementary materials to take advantage of their intrinsic characteristics. The Cobra® Hybrid 8-25 clip and screw are resistant to extreme temperatures, insects, chemicals, chlorine, frost and humidity without oxidizing.
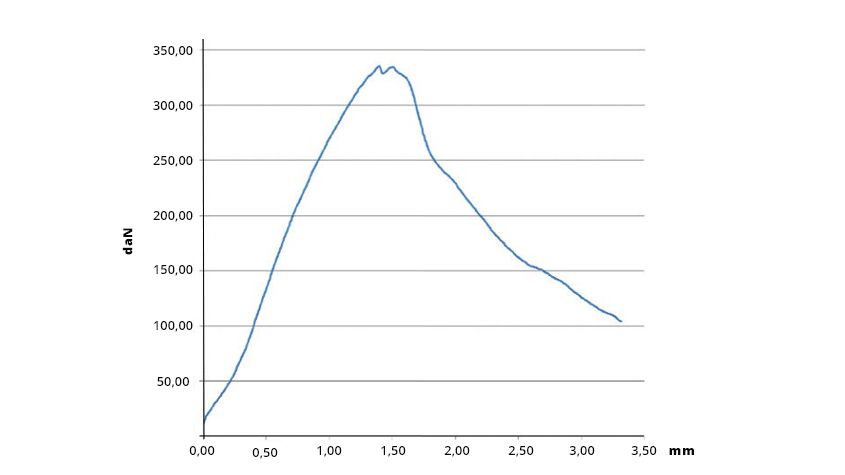
The tear resistance differs according to the type of joist: 205 kg on aluminum joist, 320 kg on hardwood joist and 135 kg on softwood joist.
For any project less than 50 m from the coast or in confined places, little ventilated and under constant saline atmosphere (in "polluted" environments), please consult us.
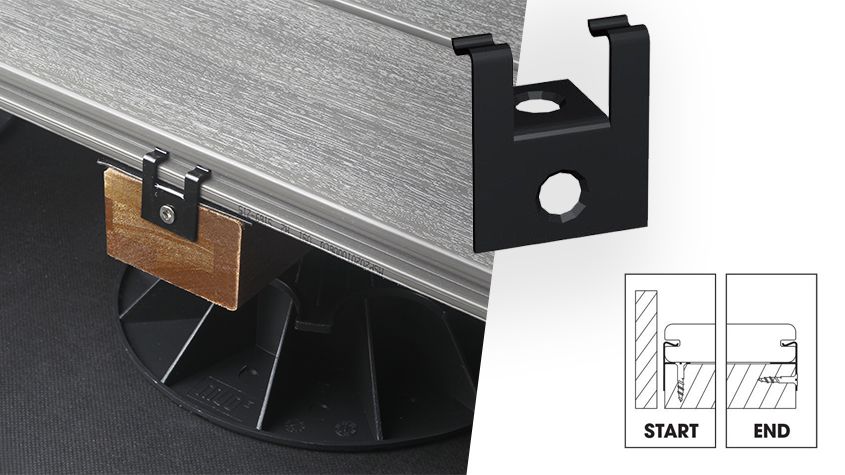
Optional: Start and end clip
The Start/End clip or the Start and End clip can be used in addition to avoid any visible screws on the decking.
Alternatively, Cobra® stainless steel WPC coloured head screws can be used.
A removable structure: the steps to replace a boards
A special tip with elongated head to screw (or unscrew) between the two boards is provided. A major advantage to replace a defective board or access the cables under your deck without having to disassemble the entire structure. Here are the steps:
1. Unscrew the clips
2. Spread the clips on the ends
3. Remove the old boards
4. Place the new boards
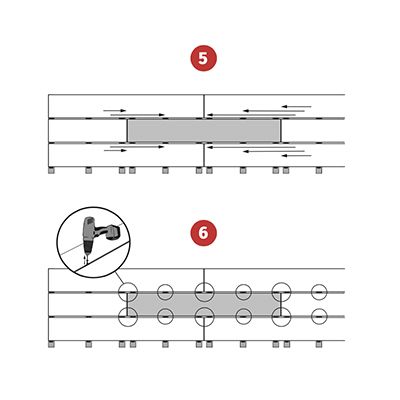
5. Replace the clips
6. Screw in the new boards